소개
Ray는 인공지능 개발, 배포 및 스케일링을 손쉽게 할 수 있도록 도와주는 프레임워크입니다.
Ray is a unified framework for scaling AI and Python applications. Ray consists of a core distributed runtime and a toolkit of libraries (Ray AIR) for simplifying ML compute

Ray에는 여러 툴킷이 있으나, 이 글에서는 Ray Serve의 기초적인 사용법과 배포 과정에서 발생한 이슈를 다룹니다.
Ray Serve 작동 원리
Ray Serve는 언어에 구애받지 않고 AI를 손쉽게 배포하고 확장하기 위해 만들어진 라이브러리입니다.
주요 특징
- Ingress Network 지원: Ray Cluster 위에서 빠르게 확장할 수 있으며, 여러 worker에 대한 별도 로드밸런서가 필요 없습니다.
- 독립 배포 간 호출: 서로 다른 배포가 상호 호출할 수 있도록 설계되어 있습니다.
- 클러스터 기반 설계: 단일 Head Node로도 클러스터를 구성할 수 있습니다.
개발 환경
Hardware
- CPU: Intel Core i9-9960X @ 3.10GHz
- GPU: GeForce RTX 2080 Ti
- RAM: 128GB
Software
- OS: Ubuntu 18.04.6 LTS
- conda: 4.12.0
- Python: 3.10.4
- Ray: 2.0.0
Tools
- Visual Studio Code (IDE)
- ngrok (SSL tunneling)
- loader.io (stress testing)
- nvtop (GPU load check)
- bashtop (performance monitoring)
기본 세팅 및 Ray Cluster 실행
환경 설정
conda create <가상환경명> python=3.10
conda activate <가상환경명>

pip install -U "ray[default]"
pip install -U "ray[serve]"
클러스터 시작
ray start --head --port 6379 --num-gpus 2
| 옵션 | 설명 |
|---|---|
--head |
해당 노드를 클러스터의 Head Node로 지정 |
--port |
Head Ray 프로세스가 사용할 포트 |
--num-gpus |
노드의 GPU 개수 (미지정 시 자동 감지) |
클러스터 실행 후 http://localhost:8265에서 대시보드를 확인할 수 있습니다.
Ray Serve 기반 배포 개발
ResNet 모델을 사용하여 Ray Serve 배포를 구현합니다.
프로젝트 구조
ray-serve-study
 ┣ data          # 모델이 사용하는 데이터
 ┣ models        # 모델 코드
 ┣ ResNet18.pt   # 저장된 모델
 ┣ conf.yaml     # Ray Serve 배포 설정
 ┗ raytest.py    # Ray Serve 코드
Ray Serve 코드 (raytest.py)
import ray
from ray import serve

import torch
import torchvision
from torchvision import transforms

from fastapi import FastAPI
from starlette.requests import Request
from typing import Dict

import os
import uuid
import time

app = FastAPI()

@serve.deployment(route_prefix="/", ray_actor_options={"num_gpus": 0.5})
@serve.ingress(app)
class ImageModel:
    def __init__(self):
        self.BATCH_SIZE = 125
        self.DEVICE = 'cuda:0'

        self.model = torch.load('./ResNet18.pt', map_location=self.DEVICE)
        self.model.to(self.DEVICE)
        self.transform_test = transforms.Compose([
            transforms.RandomCrop(32, padding=4),
            transforms.ToTensor(),
            transforms.Normalize((0.4914, 0.4822, 0.4465), (0.2023, 0.1994, 0.2010)),
        ])
        self.testset = torchvision.datasets.CIFAR10(
            root='./data', train=False, download=True, transform=self.transform_test
        )
        self.testloader = torch.utils.data.DataLoader(
            self.testset, batch_size=self.BATCH_SIZE, shuffle=False, num_workers=2
        )

    @app.get("/")
    async def test(self, starlette_request: Request) -> Dict:
        correct_pred, num_examples = 0, 0
        start = time.time()
        uid = uuid.uuid4()

        for i, (features, targets) in enumerate(self.testloader):
            print(uid, "-", i)
            features = features.to(self.DEVICE)
            targets = targets.to(self.DEVICE)
            logits, probas = self.model(features)
            _, predicted_labels = torch.max(probas, 1)
            num_examples += targets.size(0)
            correct_pred += (predicted_labels == targets).sum()

        output = float(correct_pred.float() / num_examples * 100)
        return {"accuracy": "{}%".format(output), "time": time.time() - start}

image_model = ImageModel.bind()
주요 데코레이터 설명
@serve.deployment(ray_actor_options={"num_gpus": 0.5}): GPU 리소스를 0.5만 사용합니다.@serve.ingress(app): FastAPI와 Ray Serve를 통합합니다.
배포
배포 설정 (conf.yaml)
import_path: raytest:image_model

runtime_env: {}

deployments:
- name: ImageModel
  num_replicas: 2
배포 실행
serve deploy conf.yaml
curl http://localhost:8000
성능 테스트
Ray Serve의 클러스터링 효과를 검증하기 위해 기존 모놀리틱 배포와 성능을 비교합니다.
테스트 조건
- 1분간 100건의 요청
- 10초 초과 시 timeout 처리
- timeout 비율 50% 초과 시 테스트 중단
Ray Serve (4 replica) 결과
2개 GPU에 각 2개씩 총 4개의 replica를 배포합니다.
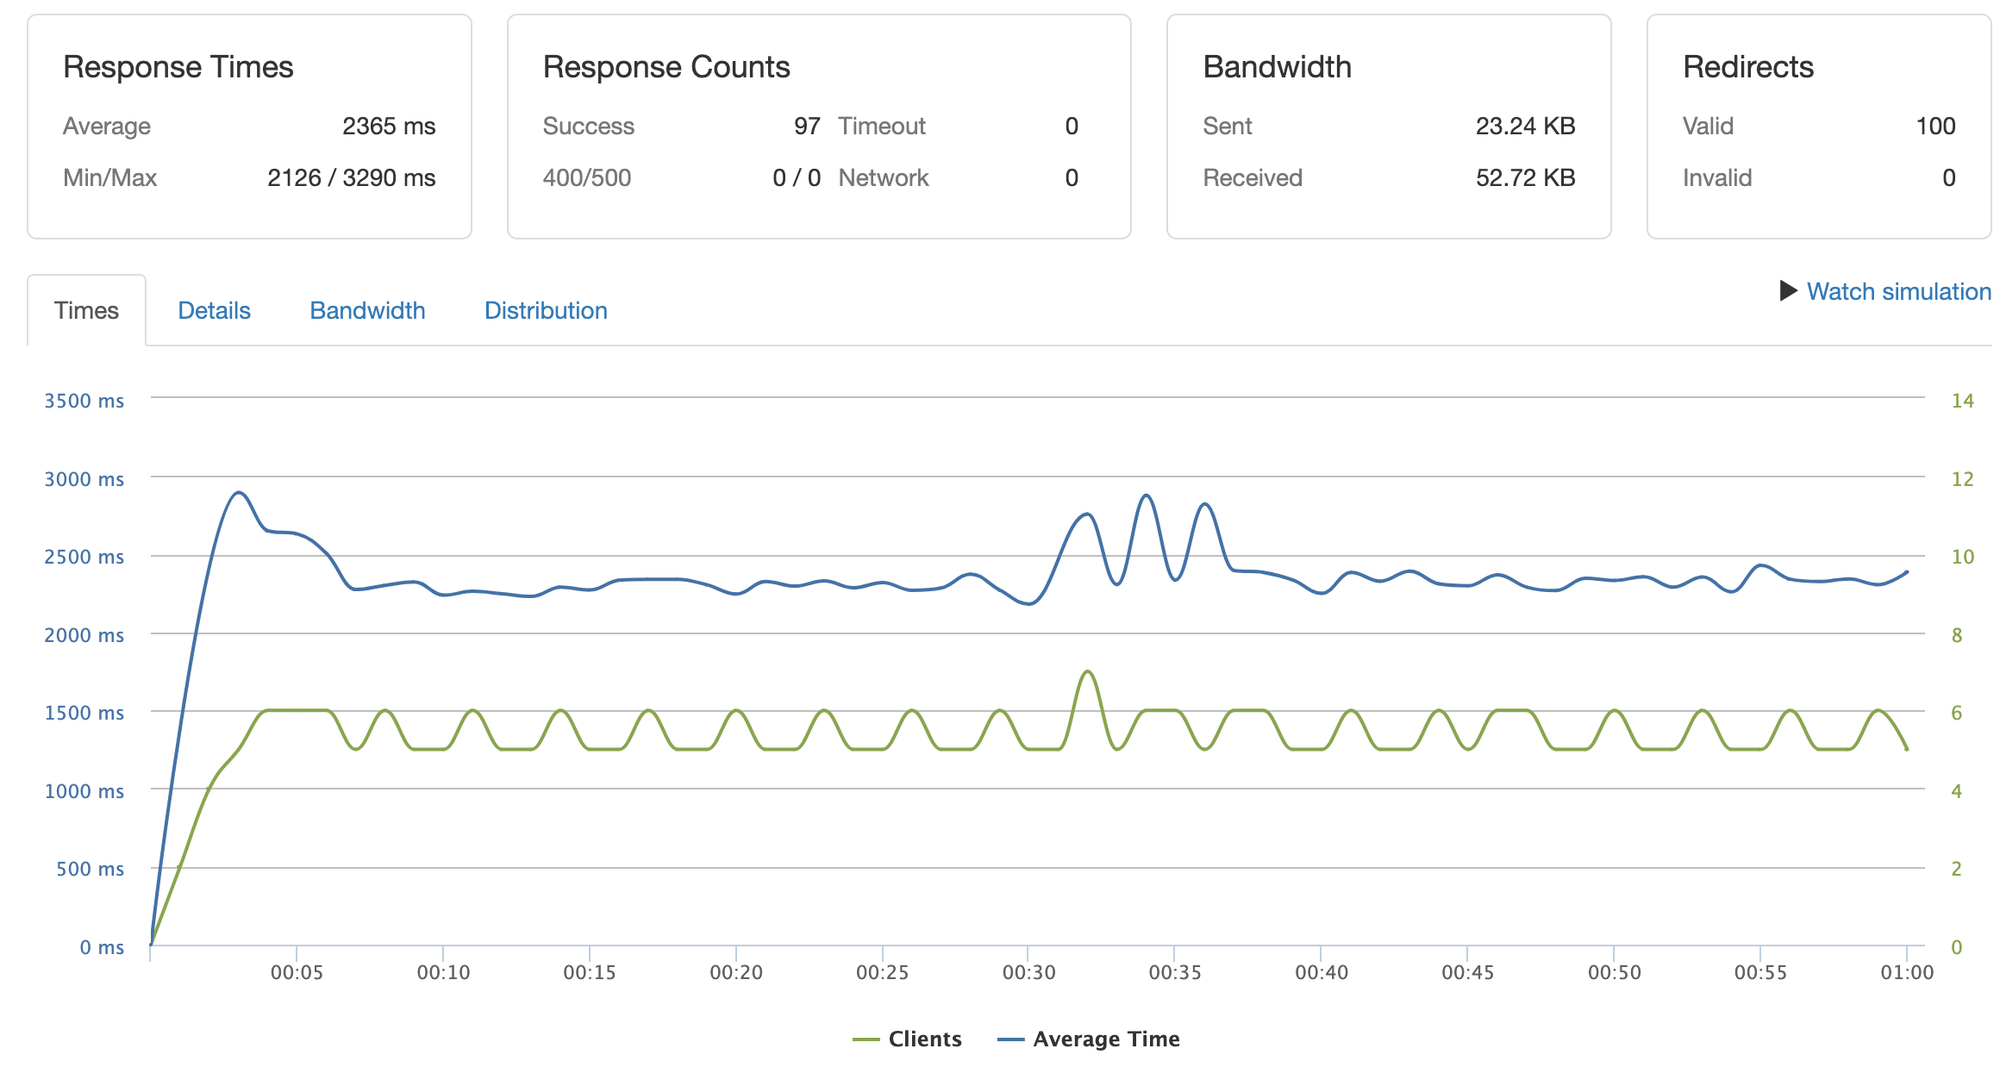
안정적으로 2.3초대 응답 시간을 유지합니다. 서버 없이 AI만 실행했을 때 평균 2~2.2초가 소요되는 것과 비교하면 큰 차이가 없습니다.
단일 FastAPI 결과

클라이언트가 약 20개 동시 접속할 때 timeout이 발생합니다. 완료된 클라이언트는 1개뿐이므로, 이 방식으로는 프로덕션 배포가 불가능합니다.
결론
테스트 결과 요약
| 구성 | 동시 처리 | 응답 시간 | 안정성 |
|---|---|---|---|
| Ray Serve 4 replica | 100건 | 2.3초 | 안정적 |
| 단일 FastAPI | 20건 | timeout | 불안정 |
장점
- TorchServe나 Ray Serve 같은 프레임워크를 사용하면 리소스 관리 측면에서 큰 이점이 있습니다.
- GPU 리소스를 세분화하여 여러 replica에 할당할 수 있습니다.
한계
- 클러스터가 실행 중일 때 배포 적용이 제대로 되지 않는 경우가 있어, 재배포 시 클러스터를 재부팅해야 하는 경우가 발생합니다.